Working with Flows
Flows are the heart of DevTools' automation capabilities. They allow you to create visual, graph-based API test workflows without writing code. This guide covers everything you need to know about building, customizing, and executing Flows.
What is a Flow?
A Flow is a visual representation of an API testing workflow. It consists of:
- Nodes: Individual steps in your workflow (HTTP requests, conditions, loops, scripts)
- Edges: Connections showing execution order and data dependencies
- Variables: Data passed between nodes
Think of Flows as:
- Visual programming for API tests
- Dependency graphs for request sequences
- Reusable test scenarios
Creating Your First Flow
Method 1: Build from Scratch
- Click New Flow in your workspace
- Drag nodes from the palette onto the canvas:
- HTTP Request - Make an API call
- Condition - Add if/else logic
- Loop - Iterate N times
- For-Each - Iterate over arrays
- JavaScript - Custom transformation logic
- Connect nodes by dragging from output handles to input handles
- Configure each node (see Node Types below)
- Click Run Flow to execute
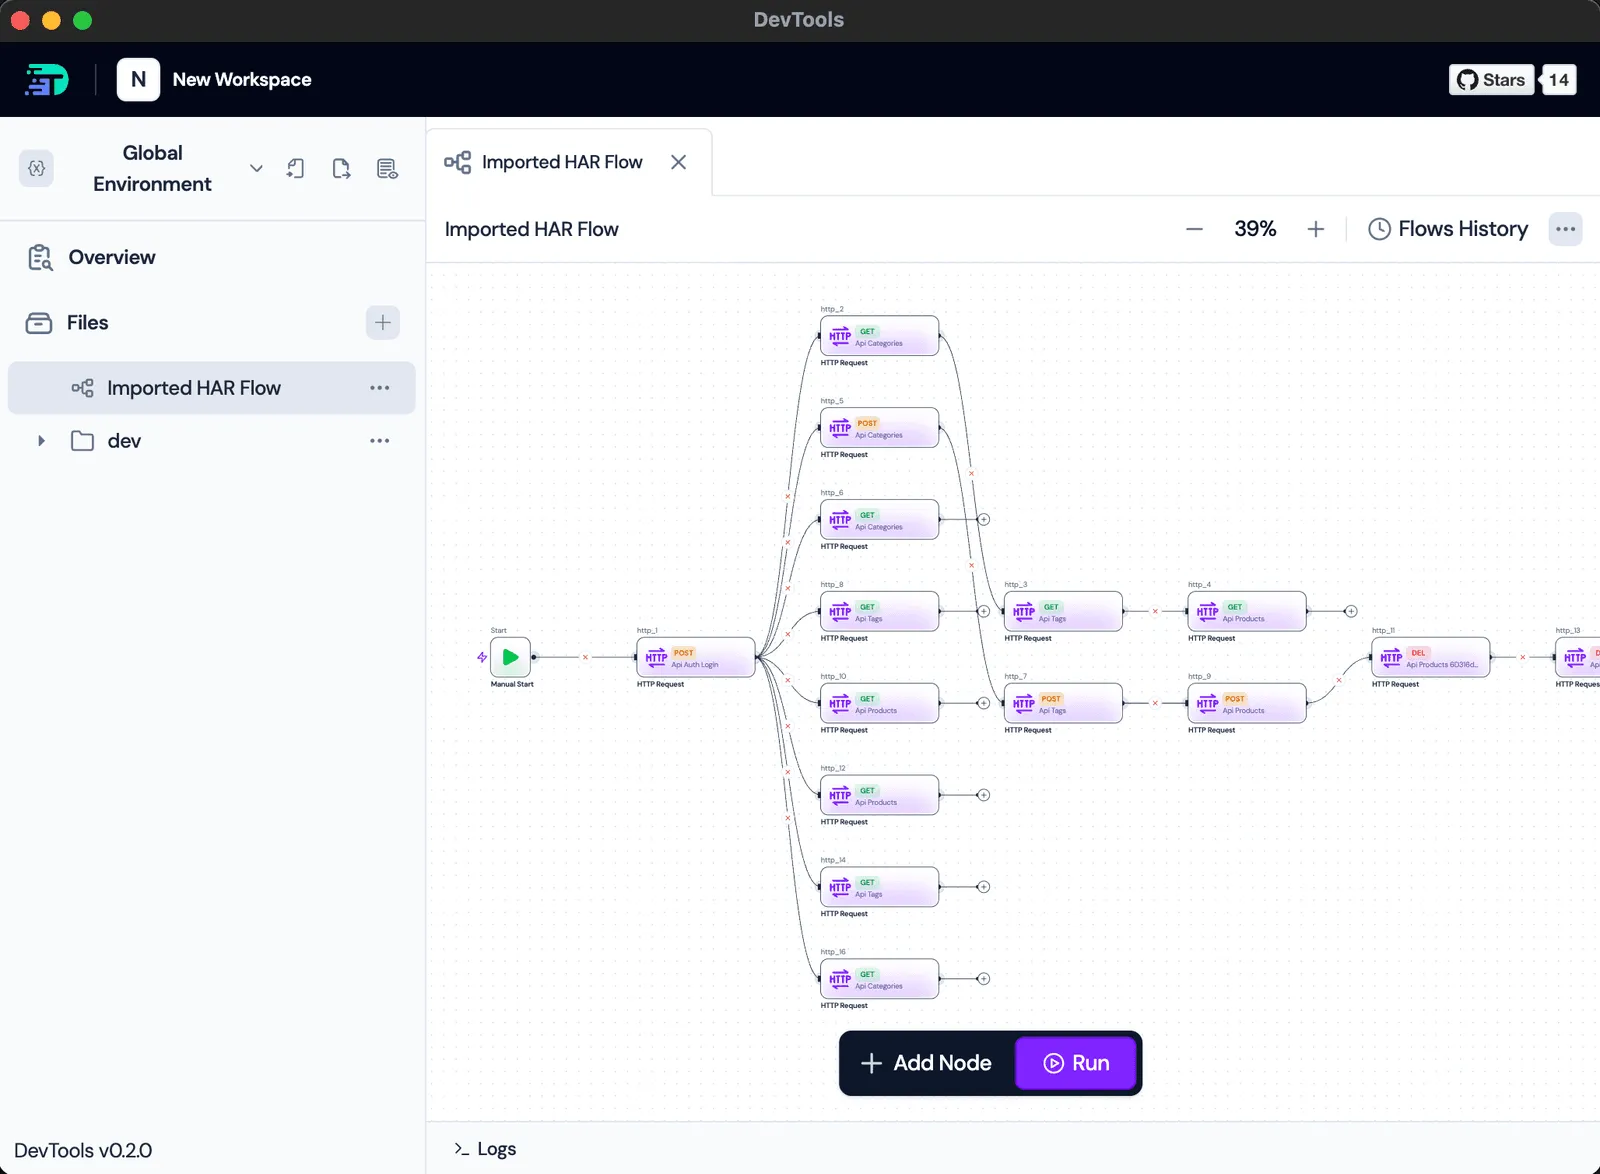
Method 2: Auto-Generate from HAR Import
When you import a HAR file, DevTools automatically creates a Flow showing:
- Request execution order
- Data dependencies between requests
- Variable extraction points
You can then customize this auto-generated Flow.
Method 3: Import from YAML
Load Flow definitions from YAML files (useful for version control and CI/CD):
Studio:
Import → YAML Flow → Select fileCLI:
devtools flow run my-flow.yamlSee YAML Flow Format below.
Node Types
1. Start Node
Every Flow begins with a Start node. It's automatically created and cannot be deleted.
Configuration:
- Name: Optional (default: "Start")
Use Case:
- Entry point for manual execution
- Trigger point when flow is called from another flow
2. HTTP Request Node
Makes an API call and captures the response.
Configuration:
- Request: Select an existing HTTP request from your workspace, or create inline
- Method: GET, POST, PUT, DELETE, PATCH, etc.
- URL: Full URL or use variables (e.g.,
{{BASE_URL}}/users) - Headers: Key-value pairs (supports variables)
- Query Params: URL query parameters
- Body: JSON, form data, raw text, or binary
- Assertions: Response validation rules
Output Variables:
Every HTTP node creates variables in this structure:
{
  request: {
    method: "POST",
    url: "https://api.example.com/login",
    headers: { "Content-Type": "application/json" },
    queries: {},
    body: { email: "user@example.com" }
  },
  response: {
    status: 200,
    body: { token: "abc123", userId: 42 },
    headers: { "Content-Type": "application/json" },
    duration: 245  // milliseconds
  }
}
Accessing Variables:
From subsequent nodes, reference this data:
{{Login.response.body.token}}
{{Login.response.status}}
{{Login.request.url}}
3. Condition Node (If/Else)
Branches execution based on a boolean expression.
Configuration:
- Condition: JavaScript expression that evaluates to true/false
- Then: Node to execute if condition is true
- Else: Node to execute if condition is false (optional)
Examples:
// Check response status
GetUser.response.status == 200

// Check response body
Login.response.body.success == true

// Compare values
CreateUser.response.body.id > 0

// String comparison
GetProfile.response.body.role == "admin"

// Complex condition
GetUsers.response.status == 200 && GetUsers.response.body.length > 0
Visual Flow:
[GetUser] → [CheckStatus]
              ├─ Then → [ProcessUser]
              └─ Else → [HandleError]
4. For Loop Node
Executes a sequence of nodes a fixed number of times.
Configuration:
- Iteration Count: Number of times to loop (can use variables)
- Loop Target: Node to execute on each iteration
- Break Condition: Optional condition to exit early
- Error Policy:
Ignore- Continue on errorBreak- Stop loop on error
Loop Variables:
Inside the loop, access:
{{LoopName.index}}        // Current iteration (0-based)
{{LoopName.iter_count}}   // Total iterations
Example:
Fetch 5 users sequentially:
- for:
    name: FetchUsers
    iter_count: 5
    loop: GetUserById

- request:
    name: GetUserById
    method: GET
    url: https://api.example.com/users/{{FetchUsers.index}}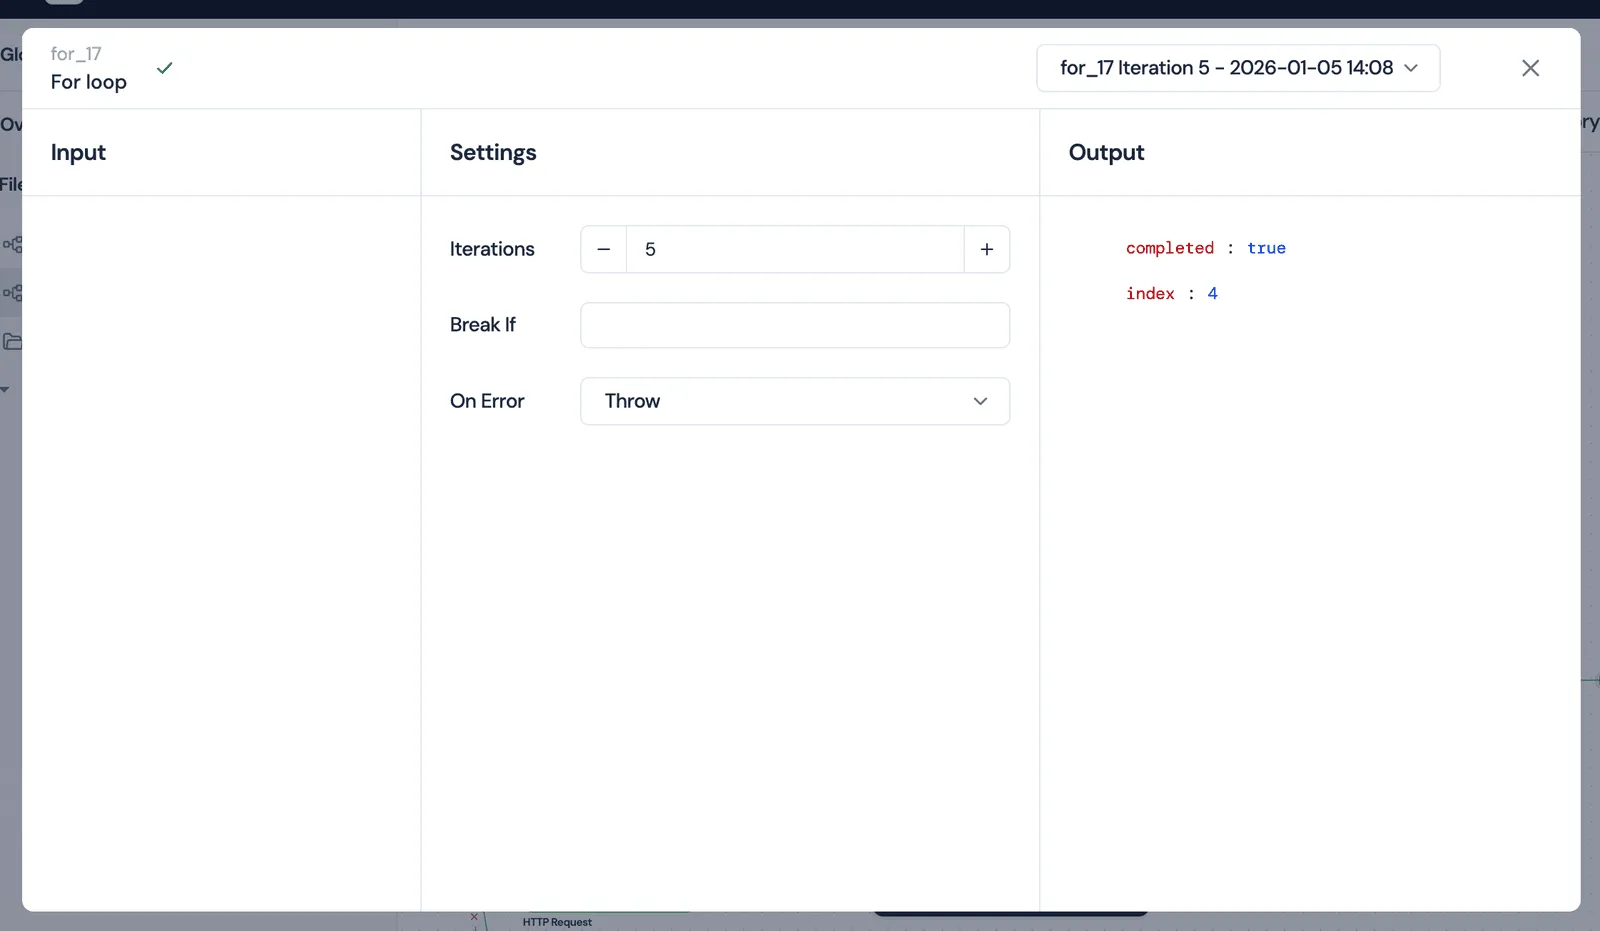
5. For-Each Loop Node
Iterates over an array of items from a previous response.
Configuration:
- Items Expression: Path to array (e.g.,
{{GetUsers.response.body}}) - Loop Target: Node to execute for each item
- Break Condition: Optional early exit
- Error Policy: Ignore or Break
Loop Variables:
Inside the loop, access:
{{ForEachName.item}}        // Current item
{{ForEachName.index}}       // Current index
Example:
Process each user from a list:
- request:
    name: GetUsers
    method: GET
    url: https://api.example.com/users

- for_each:
    name: ProcessUsers
    items: '{{GetUsers.response.body}}'
    loop: UpdateUser

- request:
    name: UpdateUser
    method: PUT
    url: https://api.example.com/users/{{ProcessUsers.item.id}}
    body:
      lastProcessed: '{{ now().Unix() }}' #timestamp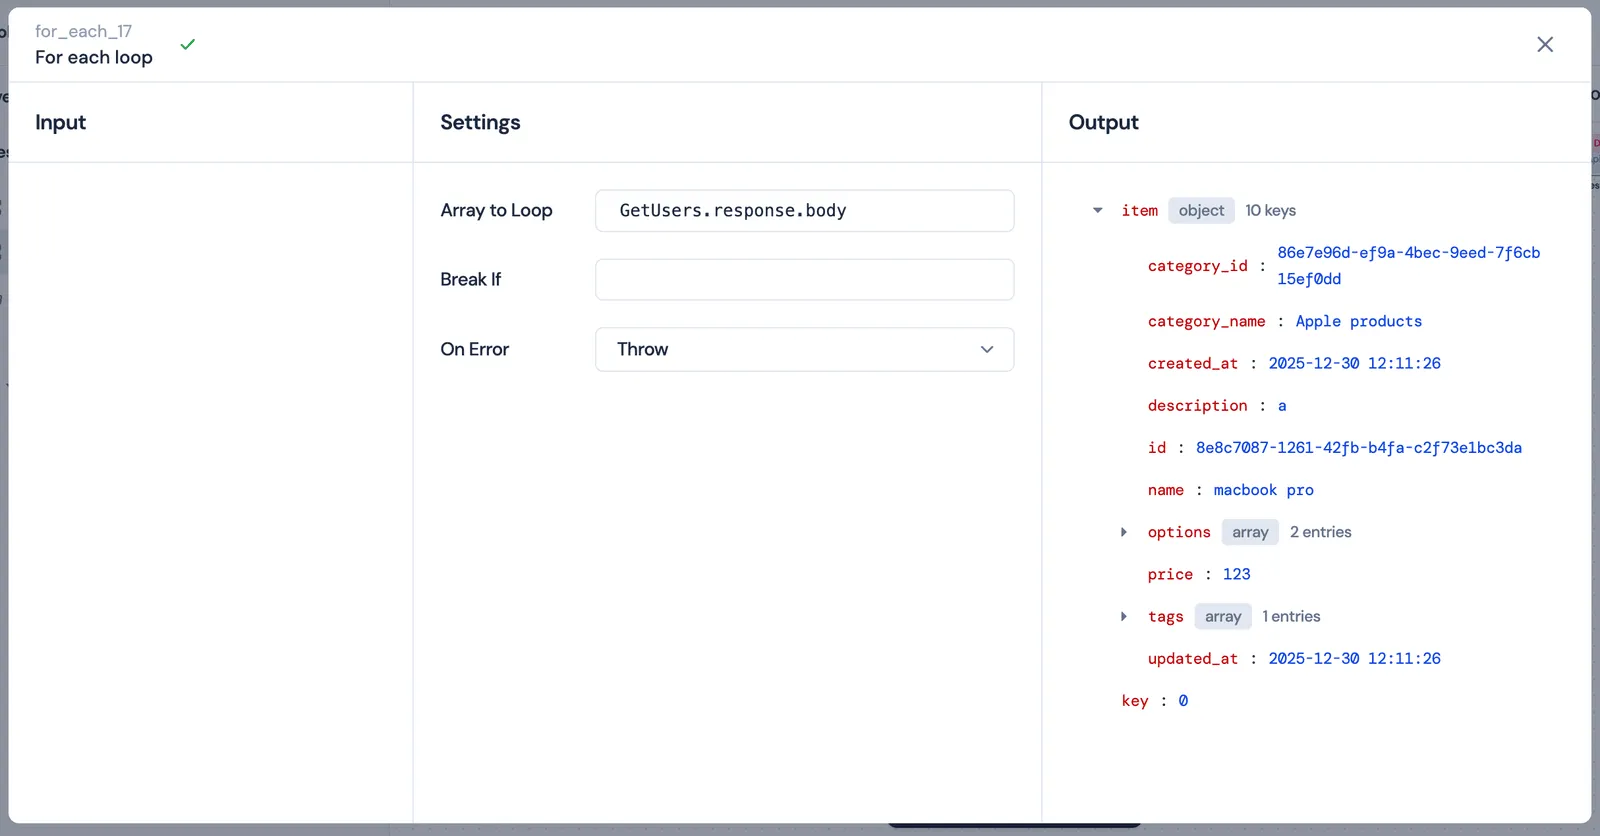
6. JavaScript Node
Executes custom JavaScript code for data transformation and complex logic.
Configuration:
- Code: JavaScript function (ES6+ syntax)
- Dependencies: Nodes that must complete before this runs
Function Signature:
export default function(context) {
  // context contains all previous node outputs
  // Return an object to make data available to subsequent nodes
  return {
    key: "value"
  };
}
Accessing Context:
export default function(context) {
  // Get data from previous HTTP node
  const users = context.GetUsers?.response?.body;

  // Get flow variables
  const baseUrl = context.BASE_URL;

  // Transform data
  const activeUsers = users.filter(u => u.active);

  // Return results
  return {
    activeCount: activeUsers.length,
    activeUserIds: activeUsers.map(u => u.id),
    processedAt: new Date().toISOString()
  };
}
Built-in Functions:
console.log()    // Logs appear in execution results
JSON.parse()     // Parse JSON strings
JSON.stringify() // Convert to JSON
Date.now()       // Current timestamp
Output:
The returned object becomes available as:
{{NodeName.activeCount}}
{{NodeName.activeUserIds}}
{{NodeName.processedAt}}
Connecting Nodes
Execution Flow
Nodes are connected using edges. An edge defines:
- Execution order: Child nodes run after parent completes
- Data dependencies: Child can access parent's output
Creating Edges:
- Click and drag from a node's output handle (right side)
- Release on another node's input handle (left side)
Handle Types
Different node types have different handles:
- Standard Nodes (HTTP, JS): One output handle
- Condition Nodes: Two output handles (Then, Else)
- Loop Nodes: Two output handles (Loop target, Next node after loop)
Example:
[Login] ──────→ [GetProfile]
        ↘
         Then → [CheckRole]
                  ├─ Then → [AdminDashboard]
                  └─ Else → [UserDashboard]
Parallel Execution
Nodes without dependencies can run in parallel:
          ┌→ [GetUser]
[Start] ──┼→ [GetPosts]
          └→ [GetComments]

[GetUser]    ┐
[GetPosts]   ├→ [CombineData]
[GetComments]┘
DevTools automatically detects parallelization opportunities.
Flow Variables
Types of Variables
Flows can access three types of variables:
- Global Variables: Available to all workspaces
- Environment Variables: Specific to the selected environment
- Flow Variables: Defined within the flow
Priority (highest to lowest):
Flow Variables > Environment Variables > Global VariablesDefining Flow Variables
Add variables at the flow level:
Studio:
Flow Settings → Variables → Add VariableYAML:
flows:
  - name: MyFlow
    variables:
      - name: user_id
        value: '1'
      - name: base_url
        value: 'https://api.example.com'
Using Variables
Reference variables with {{variable_name}} syntax:
In URLs:
{{BASE_URL}}/users/{{user_id}}In Headers:
headers:
  Authorization: Bearer {{access_token}}
  X-User-ID: '{{user_id}}'
In Body:
{
  "email": "{{user_email}}",
  "name": "{{user_name}}"
}
In Conditions:
{{GetUser.response.body.id}} == {{expected_user_id}}Node Output Variables
Every node automatically creates output variables. Access them from subsequent nodes:
Format:
{{NodeName.property.path.to.value}}Examples:
{{Login.response.body.token}}
{{GetUsers.response.status}}
{{ProcessData.activeCount}}
{{FetchUsersLoop.index}}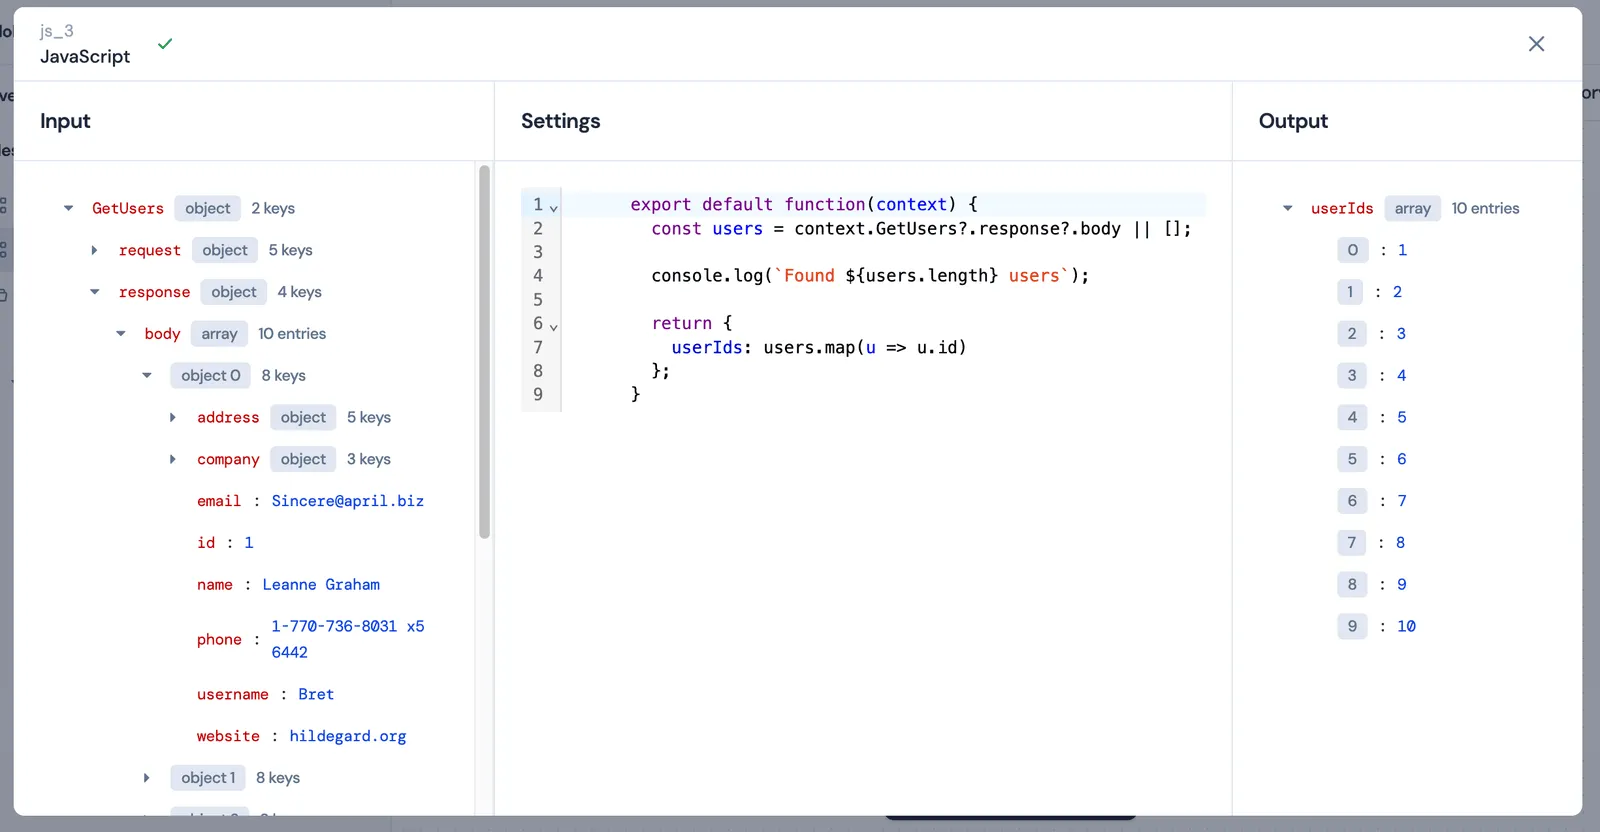
See the Environments & Variables guide for more details.
Dependencies and Execution Order
Explicit Dependencies
Use depends_on to enforce execution order:
YAML:
- request:
    name: GetUser
    method: GET
    url: https://api.example.com/users/1

- request:
    name: UpdateUser
    method: PUT
    url: https://api.example.com/users/1
    depends_on: GetUser  # Waits for GetUser to complete
Studio:
Connect nodes with edges (visual dependencies).
Implicit Dependencies
DevTools detects dependencies automatically when you:
- Reference a node's output variables
- Connect nodes visually
Example:
Using {{Login.response.body.token}} automatically creates a dependency on the Login node.
Dependency Resolution
Before execution, DevTools:
- Builds a dependency graph (DAG - Directed Acyclic Graph)
- Validates no circular dependencies exist
- Determines execution order using topological sort
- Identifies parallelization opportunities
Execution modes:
- Auto: DevTools chooses based on graph complexity
- Single: Sequential execution (easier debugging)
- Multi: Maximum parallelization (faster execution)
Assertions and Validations
Add assertions to validate API responses:
Status Code Assertions
response.status == 200
response.status >= 200 && response.status < 300
Body Assertions
response.body.success == true
response.body.users.length > 0
response.body.id != null
Header Assertions
response.headers["Content-Type"] == "application/json"
response.headers["X-Rate-Limit-Remaining"] > 0
Custom Assertions
Use JavaScript nodes for complex validations:
export default function(context) {
  const response = context.GetUser.response;

  // Validation logic
  const isValid =
    response.status === 200 &&
    response.body.email.includes('@') &&
    response.body.createdAt < Date.now();

  if (!isValid) {
    throw new Error('User validation failed');
  }

  return { validated: true };
}
Execution and Results
Running a Flow
Studio:
- Open your flow
- Click Run Flow
- Watch nodes execute in real-time (visual feedback)
- Review results when complete
CLI:
devtools flow run workspace.yaml FlowName

## Related

- Flows overview: /flows/
- Templates library: /templates/
- Postman alternative: /postman-alternative/
Execution States
Nodes transition through states:
- ⚪ Pending: Not yet executed
- 🔵 Running: Currently executing
- ✅ Success: Completed successfully
- ❌ Failure: Failed with error
- ⏸️ Canceled: Execution stopped
Viewing Results
After execution:
Node Results:
- Click any node to see:
- Input variables
- Output variables
- Request/response details
- Execution duration
- Errors (if any)
Flow Results:
- Total duration
- Success/failure count
- Execution timeline
- Variable values at each step
Execution History
DevTools maintains execution history:
- Past flow runs
- Node-level results
- Variable snapshots
- Timestamps and durations
Access history from the Flow History tab.
YAML Flow Format
Flows can be defined in YAML for version control and CI/CD:
Basic Structure
workspace_name: My Workspace

# Define variables
env:
  BASE_URL: https://api.example.com
  API_KEY: your-api-key

# Define execution order
run:
  - flow: AuthFlow
  - flow: DataFlow
    depends_on: AuthFlow

# Define flows
flows:
  - name: AuthFlow
    variables:
      - name: email
        value: user@example.com
      - name: password
        value: secret123
    steps:
      - request:
          name: Login
          method: POST
          url: '{{BASE_URL}}/auth/login'
          headers:
            Content-Type: application/json
          body:
            email: '{{email}}'
            password: '{{password}}'

  - name: DataFlow
    steps:
      - request:
          name: GetUsers
          method: GET
          url: '{{BASE_URL}}/users'
          headers:
            Authorization: Bearer {{Login.response.body.token}}

      - for_each:
          name: ProcessUsers
          items: '{{GetUsers.response.body}}'
          loop: UpdateUser

      - request:
          name: UpdateUser
          method: PUT
          url: '{{BASE_URL}}/users/{{ProcessUsers.item.id}}'
          body:
            lastSeen: '{{ now() }}'
Request Templates (DRY)
Reuse request configurations:
request_templates:
  AuthenticatedGet:
    method: GET
    headers:
      Authorization: Bearer {{Login.response.body.token}}
      Accept: application/json

flows:
  - name: DataFlow
    steps:
      - request:
          name: GetProfile
          use_request: AuthenticatedGet
          url: '{{BASE_URL}}/profile'

      - request:
          name: GetSettings
          use_request: AuthenticatedGet
          url: '{{BASE_URL}}/settings'
Best Practices
1. Use Descriptive Node Names
❌ Request1, Request2, Request3
✅ LoginUser, GetUserProfile, UpdateSettings
2. Group Related Logic
Organize flows by feature or user journey:
Authentication Flow/
User Management Flow/
Reporting Flow/
3. Extract Reusable Flows
Break complex flows into smaller, reusable sub-flows:
Main Flow
  ├─ Authentication Flow
  ├─ Data Fetch Flow
  └─ Cleanup Flow
4. Add Error Handling
Use condition nodes to handle errors gracefully:
[API Call] → [Check Status]
              ├─ Then (200) → [Process Data]
              └─ Else → [Log Error] → [Retry]
5. Use Variables for Configuration
Never hardcode values:
❌ url: https://api.staging.example.com/users
✅ url: '{{BASE_URL}}/users'
6. Document Complex Logic
Use JavaScript nodes to add comments:
export default function(context) {
  // Extract user IDs from nested response structure
  // Users are nested under data.results.items
  const items = context.GetData?.response?.body?.data?.results?.items || [];
  return { userIds: items.map(i => i.userId) };
}
7. Test Incrementally
Build flows step-by-step:
- Add one node
- Run and verify
- Add next node
- Run and verify
- Repeat
Don't build a 20-node flow without testing!
Troubleshooting
Flow Won't Run
Check:
- All nodes are connected
- No circular dependencies
- Required variables are defined
- Start node exists
Variables Not Available
Possible Causes:
- Node hasn't executed yet (check dependencies)
- Variable path is incorrect (check spelling/case)
- Node failed and didn't produce output
Solution: Check execution order and node states
Slow Execution
Optimize:
- Enable parallel execution mode
- Remove unnecessary dependencies
- Use condition nodes to skip optional steps
- Reduce loop iterations
JavaScript Node Errors
Common Issues:
- Undefined variable access (use optional chaining:
context.Node?.property) - JSON parsing errors (validate response format)
- Syntax errors (check ES6 compatibility)
Debug: Add console.log() statements and check execution results
Next: Learn about Environments & Variables to manage configurations across different deployment stages.